
| Site notice |
|---|
Welcome! Please check To-Do List to see what pages need help, who is working on what, etc.
|
Difference between revisions of "Mega Man X6"
From Mega Man Wiki
(→For X) |
Unknowni123 (talk | contribs) m (Text replacement - "Permanently doubles the amount of extra lives the player has when starting a stage." to "Permanently increases the player's initial amount of extra lives by 2.") |
||
| (57 intermediate revisions by 5 users not shown) | |||
| Line 1: | Line 1: | ||
{{PrevNext | next = ''[[Mega Man X7]]'' | series = [[X series]] | prev = ''[[Mega Man X5]]'' }} | {{PrevNext | next = ''[[Mega Man X7]]'' | series = [[X series]] | prev = ''[[Mega Man X5]]'' }} | ||
{{Mega Man X6/Header}} | |||
{{Game Infobox | {{Game Infobox | ||
| image = [[File:MMX6 - Box Art]] | | image = {{#tag:tabber|Box Art [NA]=[[File:MMX6 - Box Art NA.jpg|200px]]{{#if:{{{Box Art [JP]}}}|{{!}}-{{!}}Box Art [JP]=[[File:RMX6.jpg|200px]]}}}} | ||
| caption = Box Art | | caption = Box Art | ||
| game_title = Mega Man X6, Rockman X6 | | game_title = Mega Man X6, Megaman X6, Rockman X6 | ||
| developer = [[Capcom]] | | developer = [[Capcom]] | ||
| publisher = Capcom | | publisher = Capcom | ||
| release_dates = 2001 | | release_dates = {{Release dates|console=PlayStation|jp=November 29, 2001|na=December 4, 2001|eu=February 8, 2002}} | ||
| genres = Action, Platformer | {{Release dates|console=Windows|ko=December 12, 2002|as=June 13, 2003}} | ||
| genres = Action, Platformer | |||
| game_modes = Single Player | | game_modes = Single Player | ||
| platforms = [[PlayStation]]<br/>[[Windows]] | |||
| platforms = | |||
}} | }} | ||
'''''Mega Man X6''''', known in Japan as '''''Rockman X6''''' (ロックマンX6, ''Rokkuman X6'') is the sixth entry in the main [[X series|''X'' series]], developed and published by [[Capcom]] for the [[PlayStation]] in 2001-2002, becoming the final ''[[Mega Man (series)|Mega Man]]'' game for the console. It later received a [[Windows]] port in a few regions. | |||
== Story == | |||
Three weeks after the fall of the [[Eurasia]] colony, a mysterious phenomenon called the [[Nightmare]] begins to occur. Rumors spread that the cause of these Nightmares is the ghost of [[Zero]], leading [[X]] to embark on an investigation. Secretly, the genius scientist [[Gate]] is manipulating the Nightmare from the shadows, having created it from a fragment containing Zero's [[DNA]]. He also used it to create the strongest Reploid ever, [[High Max]], who now stands in X's way. Can X put a stop to Gate's ambitions...?<ref>''Mega Man X6'', ''Compendium of Rockman X''. 2005.</ref> | |||
== Characters == | == Characters == | ||
| Line 23: | Line 23: | ||
|- | |- | ||
! Name | ! Name | ||
! style="width:32px;" | | ! style="width:32px;" | Image | ||
! Description | ! Description | ||
|- | |- | ||
| [[X]] | | [[X]] | ||
| style="text-align:center" | [[File:MMX6 - X. | | style="text-align:center" | [[File:MMX6 - X.gif]] | ||
| | | X leads the 17th Unit of the Maverick Hunters. He's working on the Earth recovery operation with other Hunters when he receives Alia's SOS.<ref name="X6Manual">Game manual, ''Mega Man X6''. 2001.</ref> | ||
|- | |- | ||
| [[Zero]] | | [[Zero]] | ||
| style="text-align:center" | [[File:MMX6 - Zero. | | style="text-align:center" | [[File:MMX6 - Zero.gif]] | ||
| | | Zero once headed up the Special 0 Unit. An SA-Class Hunter, he single-handedly saved the Earth from destruction. He has been missing since the Sigma incident. Few believe he'll ever be found.<ref name="X6Manual"/> | ||
|- | |- | ||
| [[Alia]] | | [[Alia]] | ||
| style="text-align:center" | [[File:MMX6 - Alia.png]] | | style="text-align:center" | [[File:MMX6 - Alia Dialogue.png]] | ||
| | | The Hunters' navigator, Alia analyzes situations and provides appropriate backup for Hunters on missions. She has an impressive aptitude for analyzing computer programs.<ref name="X6Manual"/> | ||
|- | |- | ||
| [[Signas]] | | [[Signas]] | ||
| style="text-align:center" | [[File:MMX6 - Signas.png]] | | style="text-align:center" | [[File:MMX6 - Signas Cropped Cutscene.png|x90px]] | ||
| | | The young general of the Hunters, Signas has gained the corps' trust and loyalty with his cool judgement and level-headed leadership.<ref name="X6Manual"/> | ||
|- | |- | ||
| [[Douglas]] | | [[Douglas]] | ||
| style="text-align:center" | [[File:MMX6 - Douglas.png]] | | style="text-align:center" | [[File:MMX6 - Douglas Cropped Menu.png|90x90px]] | ||
| | | An expert mechanic, Douglas devises and maintains all the Hunters' equipment, including weapons, vehicles, and facilities. He has thrown himself into the recovery operation with fierce dedication.<ref name="X6Manual"/> | ||
|- | |||
| [[Zero Nightmare]] | |||
| style="text-align:center" | [[File:MMX6 - Zero Nightmare.gif]] | |||
| A mysterious and dangerous being that highly resembles Zero. Some are calling it the "ghost of Zero", but what is its true nature? | |||
|- | |||
| [[High Max]] | |||
| style="text-align:center" | [[File:MMX6 - High Max.png]] | |||
| High Max leads an investigative team created by Isoc. His abilities are said to surpass X and Zero's — yet no one knows why he was created.<ref name="X6Manual"/> | |||
|- | |- | ||
| [[ | | [[Isoc]] | ||
| style="text-align:center" | [[File:MMX6 - | | style="text-align:center" | [[File:MMX6 - Isoc Cropped Cutscene.png|x90px]] | ||
| | | The scientist Reploid Isoc pulls together an investigative team to resolve the mystery of the "Nightmare Phenomenon."<ref name="X6Manual"/> | ||
|- | |- | ||
| [[ | | [[Gate]] | ||
| style="text-align:center" | [[File:MMX6 - | | style="text-align:center" | [[File:MMX6 - Gate.png]] | ||
| | | Once considered a genius in Reploid development, Gate has lately been shunned in scientific circles because his research was misunderstood. His luck begins to change when he discovers something interesting...<ref name="X6Manual"/> | ||
|- | |- | ||
| [[ | | [[Sigma]] | ||
| style="text-align:center" | [[File:MMX6 - | | style="text-align:center" | [[File:MMX6 - Sigma (1st form).gif]] | ||
| | | The evil mastermind who was defeated by Zero after his plans nearly destroyed the planet. Someone has helped him return from the dead, but he's definitely worse for wear. | ||
|- | |- | ||
| [[ | | [[Dynamo]] | ||
| style="text-align:center" | [[File: | | style="text-align:center" | [[File:MMX5 - Dynamo.gif]] | ||
| | | A mercenary once hired by Sigma. He now seeks to profit off the power of the Nightmare. | ||
|- | |- | ||
| [[Dr. Light]] | | [[Dr. Light]] | ||
| style="text-align:center" | [[File: | | style="text-align:center" | [[File:MMX4 - Dr. Light.gif]] | ||
| | | The creator of X, who has left [[Light Capsule]]s to deliver [[Armor Part]]s to him, years after his own passing. | ||
|} | |} | ||
== Enemies == | == Enemies == | ||
=== Minor Enemies === | === Minor Enemies === | ||
{| class="wikitable" style="width:100%;" | |||
! Name | |||
! style="width:32px;" | Image | |||
! Description | |||
! Stage(s) | |||
|- | |||
| [[Batton Bone B82]] | |||
| style="text-align:center;" | [[File:MMX6 - Batton Bone B82.png]] | |||
| | |||
| [[Inami Temple]] | |||
|- | |||
| [[Blast Raster]] | |||
| style="text-align:center;" | [[File:MMX6 - Blast Raster.png]] | |||
| | |||
| | |||
|- | |||
| [[Caterpiride]] | |||
| style="text-align:center;" | [[File:MMX6 - Caterpiride.png]] | |||
| | |||
| [[Amazon Area]] | |||
|- | |||
| [[Death Press D]] | |||
| style="text-align:center;" | [[File:MMX6 - Death Press D.png]] | |||
| | |||
| [[Laser Institute]] | |||
|- | |||
| [[Ground Sniper]] | |||
| style="text-align:center;" | [[File:MMX6 - Ground Sniper.png]] | |||
| | |||
| | |||
|- | |||
| [[Group Jet]] | |||
| style="text-align:center;" | [[File:MMX6 - Group Jet.png]] | |||
| | |||
| [[Weapon Center]] | |||
|- | |||
| [[Hover Gunner]] | |||
| style="text-align:center;" | [[File:MMX6 - Hover Gunner.png]] | |||
| | |||
| {{MMX6Link|Opening stage}} | |||
|- | |||
| [[Junkroid]] | |||
| style="text-align:center;" | [[File:MMX6 - Junkroid.png]] | |||
| | |||
| {{MMX6Link|Opening stage}}, [[Recycle Lab]] | |||
|- | |||
| [[Killer Moth]] | |||
| style="text-align:center;" | [[File:MMX6 - Killer Moth.png]] | |||
| | |||
| [[Amazon Area]] | |||
|- | |||
| [[Meta Dridler]] | |||
| style="text-align:center;" | [[File:MMX6 - Meta Dridler.png]] | |||
| | |||
| {{MMX6Link|Opening stage}} | |||
|- | |||
| [[Metall T]] | |||
| style="text-align:center;" | [[File:MMX6 - Metall T.png]] | |||
| | |||
| [[Laser Institute]], [[Recycle Lab]] | |||
|- | |||
| [[Meta Wheel F]] | |||
| style="text-align:center;" | [[File:MMX6 - Meta Wheel F.png]] | |||
| | |||
| {{MMX6Link|Opening stage}} | |||
|- | |||
| [[Monbando]] | |||
| style="text-align:center;" | [[File:MMX6 - Monbando.png]] | |||
| | |||
| [[Inami Temple]] | |||
|- | |||
| [[Nightmare Bug]] | |||
| style="text-align:center;" | [[File:MMX6 - Nightmare Bug.png]] | |||
| Flies in in certain areas and stays near the character to block attacks if Commander Yammark's Nightmare is active. Attacking it a few times drives it away. | |||
| [[Magma Area]] | |||
|- | |||
| [[Nightmare Cube]] | |||
| style="text-align:center;" | [[File:MMX6 - Nightmare Cube.png]] | |||
| | |||
| [[Laser Institute]] | |||
|- | |||
| [[Nightmare Fire]] | |||
| style="text-align:center;" | [[File:MMX6 - Nightmare Fire.png]] | |||
| Falls from the sky at random in certain areas if Blaze Heatnix's Nightmare is active. | |||
| [[Northpole Area]] | |||
|- | |||
| [[Nightmare Insect]] | |||
| style="text-align:center;" | [[File:MMX6 - Nightmare Insect.png]] | |||
| | |||
| [[Amazon Area]] | |||
|- | |||
| [[Nightmare Iron]] | |||
| style="text-align:center;" | [[File:MMX6 - Nightmare Iron.png]] | |||
| | |||
| [[Weapon Center]] | |||
|- | |||
| [[Nightmare Laser]] | |||
| style="text-align:center;" | [[File:MMX6 - Nightmare Laser.png]] | |||
| | |||
| [[Laser Institute]] | |||
|- | |||
| [[Nightmare Mirror]] | |||
| style="text-align:center;" | [[File:MMX6 - Nightmare Mirror.png]] | |||
| A copy of X or Zero (the opposite to the player's character) sometimes appears in certain areas and charges at the player if Shield Sheldon's Nightmare is active. | |||
| [[Inami Temple]], [[Northpole Area]] | |||
|- | |||
| [[Nightmare Random]] | |||
| style="text-align:center;" | [[File:MMX6 - Nightmare Random.png]] | |||
| | |||
| [[Central Museum]] | |||
|- | |||
| [[Nightmare Virus]] | |||
| style="text-align:center;" | [[File:MMX6 - Nightmare Virus.png]] | |||
| | |||
| | |||
|- | |||
| [[Probe 8201-U type]]{{conjecture}} | |||
| style="text-align:center;" | [[File:MMX6 - Probe 8201-U type.png]] | |||
| | |||
| [[Inami Temple]] | |||
|- | |||
| [[Sea Attacker ST]] | |||
| style="text-align:center;" | [[File:MMX6 - Sea Attacker ST.png]] | |||
| | |||
| [[Inami Temple]] | |||
|- | |||
| [[Totem Exit]] | |||
| style="text-align:center;" | [[File:MMX6 - Totem Exit.png]] | |||
| | |||
| [[Central Museum]] | |||
|- | |||
| [[Totem Gate]] | |||
| style="text-align:center;" | [[File:MMX6 - Totem Gate.png]] | |||
| | |||
| [[Central Museum]] | |||
|- | |||
| [[Weather Analyze]] | |||
| style="text-align:center;" | [[File:MMX6 - Weather Analyze.png]] | |||
| | |||
| [[Inami Temple]] | |||
|- | |||
| [[Wolfloid]] | |||
| style="text-align:center;" | [[File:MMX6 - Wolfloid.png]] | |||
| | |||
| [[Northpole Area]] | |||
|- | |||
| [[Worm Sniper]] | |||
| style="text-align:center;" | [[File:MMX6 - Worm Sniper.png]] | |||
| | |||
| [[Amazon Area]] | |||
|} | |||
=== Mini Bosses === | |||
{| class="wikitable" style="width:100%;" | |||
! Name | |||
! style="width:32px;" | Image | |||
! Description | |||
! Stage(s) | |||
|- | |||
| [[Illumina]] | |||
| style="text-align:center;" | [[File:MMX6 - Illumina.png]] | |||
| | |||
| [[Weapon Center]] | |||
|- | |||
| [[Nightmare Pressure]] | |||
| style="text-align:center;" | [[File:MMX6 - Nightmare Pressure.png]] | |||
| | |||
| [[Recycle Lab]] | |||
|- | |||
| [[Nightmare Snake]] | |||
| style="text-align:center;" | [[File:MMX6 - Nightmare Snake.png]] | |||
| | |||
| [[Magma Area]] | |||
|} | |||
=== Bosses === | |||
=== Mavericks === | ==== Mavericks ==== | ||
{| class="wikitable" style="width:100%;" | {| class="wikitable" style="width:100%;" | ||
|- | |- | ||
! rowspan = "2" | Name | ! rowspan = "2" | Name | ||
! rowspan = "2" style="width:32px;" | | ! rowspan = "2" style="width:32px;" | Image | ||
! rowspan = "2" | Description | ! rowspan = "2" | Description | ||
! colspan = "2" | Weapon | ! colspan = "2" | Weapon | ||
| Line 89: | Line 266: | ||
! X | ! X | ||
! Zero | ! Zero | ||
|- | |- | ||
| [[Commander Yammark]] | | [[Commander Yammark]] | ||
| style="text-align:center" | [[File:MMX6 - Commander Yammark. | | style="text-align:center" | [[File:MMX6 - Commander Yammark.gif]] | ||
| | | | ||
| colspan = "2" | Yammar Option | | colspan = "2" | Yammar Option | ||
| Ray Arrow | | Ray Arrow | ||
| Rekkoha | | Rekkoha | ||
|- | |- | ||
| [[ | | [[Rainy Turtloid]] | ||
| style="text-align:center" | [[File:MMX6 - | | style="text-align:center" | [[File:MMX6 - Rainy Turtloid.gif]] | ||
| | | | ||
| Meteor Rain | | Meteor Rain | ||
| Ensuizan | | Ensuizan | ||
| Ice Burst | | Ice Burst | ||
| Line 146: | Line 285: | ||
| style="text-align:center" | [[File:MMX6 - Shield Sheldon.png]] | | style="text-align:center" | [[File:MMX6 - Shield Sheldon.png]] | ||
| | | | ||
| colspan = "2" | Guard Shell | | colspan = "2" | Guard Shell | ||
| Metal Anchor | | Metal Anchor | ||
| Rakukojin | | Rakukojin | ||
|- | |- | ||
| | | [[Blizzard Wolfang]] | ||
| style="text-align:center" | [[File:MMX6 - Blizzard Wolfang.gif]] | |||
| | |||
| Ice Burst | |||
| | | Hyoroga | ||
| Magma Blade | |||
| Shoenzan | |||
|- | |- | ||
| [[Blaze Heatnix]] | |||
| style="text-align:center" | [[File:MMX6 - Blaze Heatnix.gif]] | |||
| | |||
| Magma Blade | |||
| Shoenzan | |||
| Ground Dash | |||
| Sentsuizan | |||
|- | |- | ||
| [[ | | [[Infinity Mijinion]] | ||
| style="text-align:center" | [[File:MMX6 - | | style="text-align:center" | [[File:MMX6 - Infinity Mijinion.gif]] | ||
| | | | ||
| Ray Arrow | |||
| Rekkoha | |||
| colspan = "2" | Guard Shell | |||
|- | |||
| [[Metal Shark Player]] | |||
| style="text-align:center" | [[File:MMX6 - Metal Shark Player.gif]] | |||
| | | | ||
| Metal Anchor | |||
| Rakukojin | |||
| Meteor Rain | |||
| Ensuizan | |||
|- | |||
| [[Ground Scaravich]] | |||
| style="text-align:center" | [[File:MMX6 - Ground Scaravich.gif]] | |||
| | | | ||
| | | Ground Dash | ||
| Sentsuizan | |||
| colspan = "2" | Yammar Option | |||
|} | |} | ||
==== Other Bosses ==== | |||
=== | |||
== | |||
{| class="wikitable" style="width:100%;" | {| class="wikitable" style="width:100%;" | ||
|- | |- | ||
! rowspan | ! rowspan = "2" | Name | ||
! rowspan = "2" style="width:32px;" | | ! rowspan = "2" style="width:32px;" | Image | ||
! rowspan = "2" | Description | ! rowspan = "2" | Description | ||
! colspan = "2" | Weakness | ! colspan = "2" | Weakness | ||
| Line 199: | Line 339: | ||
! Zero | ! Zero | ||
|- | |- | ||
| [[D-1000]] | |||
| style="text-align:center" | [[File:MMX6 - | | style="text-align:center" | [[File:MMX6 - D-1000.png]] | ||
| | | | ||
| | | Z-Saber | ||
| | | N/A | ||
|- | |- | ||
| [[High Max]] (Opening Stage) | |||
| style="text-align:center" | [[File:MMX6 - High Max.png]] | | style="text-align:center" | [[File:MMX6 - High Max.png]] | ||
| | | | ||
| | | N/A | ||
| | | N/A | ||
|- | |- | ||
| [[Zero Nightmare]] | |||
| style="text-align:center" | [[File:MMX6 - | | style="text-align:center" | [[File:MMX6 - Zero Nightmare.gif]] | ||
| | | | ||
| | | Z-Saber | ||
| | | N/A | ||
|- | |- | ||
| [[High Max]] (Another Route) | |||
| style="text-align:center" | [[File:MMX6 - | | style="text-align:center" | [[File:MMX6 - High Max.png]] | ||
| | | | ||
| | | | ||
| | | | ||
|- | |- | ||
| [[Dynamo]] | |||
| style="text-align:center" | [[File: | | style="text-align:center;" | [[File:MMX5 - Dynamo.gif]] | ||
| | | | ||
| Meteor Rain | |||
| Ensuizan | |||
|- | |||
| [[Nightmare Mother]] | |||
| style="text-align:center" | [[File:MMX6 - Nightmare Mother.gif]] | |||
| | | | ||
| Metal Anchor | |||
| Rakukojin | |||
|- | |||
| [[High Max]] (Secret Lab) | |||
| style="text-align:center" | [[File:MMX6 - High Max.png]] | |||
| | | | ||
| | |||
| | |||
|- | |- | ||
| [[Gate]] | |||
| style="text-align:center" | [[File:MMX6 - Gate. | | style="text-align:center" | [[File:MMX6 - Gate (Combat).gif]] | ||
| | | | ||
| N/A | |||
| N/A | |||
|- | |- | ||
| | | {{MMX6Link|Sigma}} | ||
| style="text-align:center" | [[File:MMX6 - Sigma. | | style="text-align:center" | [[File:MMX6 - Sigma (1st form).gif]] | ||
| | | | ||
| | | Metal Anchor | ||
| | | Rakukojin | ||
|- | |- | ||
| | | [[Hell Sigma]] | ||
| style="text-align:center" | [[File:MMX6 - Sigma | | style="text-align:center" | [[File:MMX6 - Hell Sigma.png]] | ||
| | | | ||
| | | Ground Dash | ||
| | | Sentsuizan | ||
|- | |- | ||
|} | |} | ||
== Weapons == | == Weapons == | ||
=== | === X Weapons === | ||
{| class="wikitable" style="width:100%;" | By default, X wields the [[X-Buster]], a long-range buster, and the [[Z-Saber]], a short-range saber. By defeating the eight Maverick bosses, he copies their [[Special Weapon]]s with unique properties and elements. He can also upgrade his X-Buster and gain [[Giga Attack]]s by collecting and equipping [[Armor Parts]]. | ||
! Name | {| class="wikitable mw-collapsible" style="width:100%;" | ||
! | ! Name | ||
! Icon | |||
! Description | ! Description | ||
! Source | |||
|- | |- | ||
| [[X-Buster]] | | [[X-Buster]] | ||
| | | rowspan=2 | [[File:MMX6 - X-Buster Icon.png|center]] | ||
| | | X's default weapon. It fires up to three shots horizontally, and can be charged up for a [[Charge Shot]] of two levels. Equipping Armor Parts can alter the properties of the max Charge Shot. | ||
| rowspan=2 | Default | |||
|- | |- | ||
| [[ | | [[Z-Saber]] | ||
| | | X's default sub-weapon. It performs one powerful slash at a time. | ||
|- | |- | ||
| [[ | | [[Yammar Option]] | ||
| [[File:MMX6 - Yammar Option (X) Icon.png|center]] | |||
| | | - | ||
| [[Commander Yammark]] | |||
|- | |- | ||
| [[Ice Burst]] | | [[Ice Burst]] | ||
| [[File:MMX6 - Ice Burst Icon.png|center]] | |||
| | | - | ||
| [[Blizzard Wolfang]] | |||
|- | |- | ||
| [[Magma Blade]] | | [[Magma Blade]] | ||
| [[File:MMX6 - Magma Blade Icon.png|center]] | |||
| | | - | ||
| [[Blaze Heatnix]] | |||
|- | |- | ||
| [[Metal Anchor]] | | [[Metal Anchor]] | ||
| | | [[File:MMX6 - Metal Anchor Icon.png|center]] | ||
| | | - | ||
| [[Metal Shark Player]] | |||
|- | |||
| [[Ground Dash]] | |||
| [[File:MMX6 - Ground Dash Icon.png|center]] | |||
| - | |||
| [[Ground Scaravich]] | |||
|- | |- | ||
| [[Meteor Rain]] | | [[Meteor Rain]] | ||
| | | [[File:MMX6 - Meteor Rain Icon.png|center]] | ||
| | | - | ||
| [[Rainy Turtloid]] | |||
|- | |||
| [[Guard Shell]] | |||
| [[File:MMX6 - Guard Shell (X) Icon.png|center]] | |||
| - | |||
| [[Shield Sheldon]] | |||
|- | |- | ||
| [[Ray Arrow]] | | [[Ray Arrow]] | ||
| [[File:MMX6 - Ray Arrow Icon.png|center]] | |||
| - | |||
|- | | [[Infinity Mijinion]] | ||
| [[ | |||
|- | |- | ||
| [[Giga Attack]] | |||
| [[File:MMX6 - Giga Attack Icon.png|center]] | |||
| A powerful attack that only gains Weapon Energy when damage is taken. Attack changes depending on the Armor Parts equipped. | |||
| [[Armor Parts]] | |||
|} | |} | ||
=== | === Zero Weapons === | ||
Zero wields the [[Z-Saber]], a close-range beam saber, and the [[Z-Buster]], a long-range buster. By defeating the eight Maverick bosses, he gains [[Technique]]s to perform with his saber. Some of these Techniques are ability upgrades, while others are brand new attacks. | |||
{| class="wikitable" style="width:100%;" | |||
{| class="wikitable mw-collapsible" style="width:100%;" | |||
! Name | ! Name | ||
! | ! Icon | ||
! Description | ! Description | ||
! Source | |||
|- | |||
| [[Z-Saber]] | |||
| rowspan=2 | [[File:MMX6 - Z-Saber Icon.png|center]] | |||
| Zero's default weapon. On the ground, it can slash three times in quick succession for a combo. In the air, on walls, and on ladders, it can only slash once at a time. | |||
| rowspan=2 | Default | |||
|- | |||
| [[Z-Buster]] | |||
| Zero's default sub-weapon. Fires a single Z-Buster shot while standing still. | |||
|- | |||
| [[Yammar Option]] | |||
| [[File:MMX6 - Yammar Option (Z) Icon.png|center]] | |||
| - | |||
| [[Commander Yammark]] | |||
|- | |- | ||
| [[]] | | [[Hyoroga]] | ||
| | | [[File:MMX6 - Hyoroga Icon.png|center]] | ||
| | | - | ||
| [[Blizzard Wolfang]] | |||
|- | |||
| [[Shoenzan]] | |||
| [[File:MMX6 - Shoenzan Icon.png|center]] | |||
| - | |||
| [[Blaze Heatnix]] | |||
|- | |||
| [[Rakukojin]] | |||
| [[File:MMX6 - Rakukojin Icon.png|center]] | |||
| - | |||
| [[Metal Shark Player]] | |||
|- | |||
| [[Sentsuizan]] | |||
| [[File:MMX6 - Sentsuizan Icon.png|center]] | |||
| - | |||
| [[Ground Scaravich]] | |||
|- | |||
| [[Ensuizan]] | |||
| [[File:MMX6 - Ensuizan Icon.png|center]] | |||
| - | |||
| [[Rainy Turtloid]] | |||
|- | |||
| [[Guard Shell]] | |||
| [[File:MMX6 - Guard Shell (Z) Icon.png|center]] | |||
| - | |||
| [[Shield Sheldon]] | |||
|- | |- | ||
| [[Rekkoha]] | |||
| [[File:MMX6 - Rekkoha Icon.png|center]] | |||
| - | |||
| [[Infinity Mijinion]] | |||
|} | |} | ||
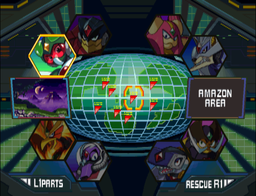
== Stages == | == Stages == | ||
<div style="width:256px; margin:0 auto;border:1px solid black;"> | |||
<!-- Image Map Generated by http://www.image-map.net/ --> | |||
<imagemap> | |||
File:MMX6 - Stage Select.png|256x224px|center|Mega Man X6 Boss Select Screen | |||
poly 100 86 161 90 188 138 159 191 100 190 73 142 [[Amazon Area]] | |||
poly 190 33 251 37 278 85 249 138 190 137 163 89 [[Imani Temple]] | |||
poly 393 35 454 39 481 87 452 140 393 139 366 91 [[Laser Institute]] | |||
poly 482 88 543 92 570 140 541 193 482 192 455 144 [[North Pole Area]] | |||
poly 102 296 163 300 190 348 161 401 102 400 75 352 [[Magma Area]] | |||
poly 190 349 251 353 278 401 249 454 190 453 163 405 [[Weapon Center]] | |||
poly 391 347 452 351 479 399 450 452 391 451 364 403 [[Recycle Lab]] | |||
poly 480 299 541 303 568 351 539 404 480 403 453 355 [[Central Museum]] | |||
</imagemap> | |||
</div> | |||
* {{MMX6Link|Opening Stage}} | |||
* [[Amazon Area]] (Commander Yammark) | |||
* [[Inami Temple]] (Rainy Turtloid) | |||
* [[Laser Institute]] (Shield Sheldon) | |||
* [[North Pole Area]] (Blizzard Wolfang) | |||
* [[Magma Area]] (Blaze Heatnix) | |||
* [[Weapon Center]] (Infinity Mijinion) | |||
* [[Recycle Lab]] (Metal Shark Player) | |||
* [[Central Museum]] (Ground Scaravich) | |||
* [[Last Stage]]s: | |||
** [[Secret Lab 1]] | |||
** [[Secret Lab 2]] | |||
** [[??????]] | |||
== Items == | == Items == | ||
{| class="wikitable" style="width:100%;" | {| class="wikitable" style="width:100%;" | ||
|- | |- | ||
! Name | ! Name | ||
! | ! Sprite | ||
! Description | ! Description | ||
|- | |- | ||
| [[]] | | [[Life Energy]] | ||
| style="text-align:center" | [[File:MMX6 - .png]] | | style="text-align:center" | [[File:MMX4 - Life Energy Small.gif]] [[File:MMX4 - Life Energy Large.gif]] [[File:MMX4 - Life Energy Max.gif]] | ||
| | | Small units restore 4 points of Life Energy.<br/>Large units restore 16 points of Life Energy.<br/>MAX units fully restore all Life Energy. | ||
|- | |||
| [[Weapon Energy]] | |||
| style="text-align:center" | [[File:MMX4 - Weapon Energy Small.gif]] [[File:MMX4 - Weapon Energy Large.gif]] [[File:MMX4 - Weapon Energy Max.gif]] | |||
| Small units restore 4 points of Weapon Energy.<br/>Large units restore 16 points of Weapon Energy.<br/>MAX units fully restore all Weapon Energy. | |||
|- | |||
| [[Nightmare Soul]] | |||
| style="text-align:center" | [[File:MMX6 - Nightmare Soul (Blue).gif]] [[File:MMX6 - Nightmare Soul (Small).gif]] [[File:MMX6 - Nightmare Soul (Green).gif]] [[File:MMX6 - Nightmare Soul (Red).gif]] | |||
| Counts towards increasing the player's [[Hunter Rank]], allowing them to equip more Parts. Each kind has a different worth and is acquired through different means. | |||
|- | |||
| [[1-UP]] | |||
| style="text-align:center" | [[File:MMX4 - 1-UP (X).gif]] [[File:MMX4 - 1-UP (Z).gif]] | |||
| Grants an extra life. | |||
|- | |||
| [[Injured Reploid]] | |||
| [[File:MMX6 - Injured Reploid Inami Temple.gif|center]] | |||
| Restores 4 points of Life Energy and grants an extra life. Certain Reploids also grant Parts, ranging from equippable Parts, to Life Ups or Energy Ups that are applied automatically. | |||
|- | |||
| [[Ride Armor]] | |||
| [[File:MMX4 - Ride Armor Raiden.png|center]] | |||
| In a Ride Armor, the player takes no damage and can use powerful punch and slash attacks. One can be found in [[Recycle Lab]]. | |||
|- | |||
| [[Portal]] | |||
| [[File:MMX6 - Portal.gif|center]] | |||
| Transports the player to a new location. Each of the eight stages has one that leads to an [[Another Route]]. | |||
|- | |||
| [[Life Up]] | |||
| [[File:MMX4 - Life Up.gif|center]] | |||
| Permanently increases maximum Life Energy by 4 points. | |||
|- | |||
| [[Sub Tank]] | |||
| [[File:MMX4 - Sub Tank.gif|center]] | |||
| Grants a reserve tank which can be filled by Life Energy pickups and used later. | |||
|- | |||
| [[Weapon Sub Tank]] | |||
| [[File:MMX4 - Weapon Sub Tank.gif|center]] | |||
| Grants a reserve tank which can be filled by Weapon Energy pickups and used later. | |||
|- | |||
| [[EX Item]] | |||
| [[File:MMX5 - EX Item.gif|center]] | |||
| Permanently increases the player's initial amount of extra lives by 2. | |||
|- | |- | ||
| [[Light Capsule]] | |||
| [[File:MMX4 - Light Capsule.gif|center]] | |||
| Grants an Armor Program; once all four are collected, they unlock a new armor for X to equip. | |||
|} | |} | ||
===Armor Parts=== | |||
{{Main|Falcon Armor|Blade Armor|Shadow Armor|Ultimate Armor}} | |||
=== Parts === | === Parts === | ||
{| class="wikitable" style="width:100%;" | {| class="wikitable" style="width:100%;" | ||
|- | |- | ||
! Name | ! Name | ||
! | ! Icon | ||
! Description | ! Description | ||
! Source | |||
|- | |||
! colspan=4 | Normal Parts | |||
|- | |||
| [[Life Up]] || [[File:MMX6 - Part Life Up.png|center]] | |||
| Permanently increases maximum Life Energy by 2 points. Applied immediately. | |||
| rowspan=2 | One [[Injured Reploid]] per stage | |||
|- | |||
| [[Energy Up]] || [[File:MMX6 - Part Energy Up.png|center]] | |||
| Permanently increases maximum Weapon Energy by 2 points. Applied immediately. | |||
|- | |||
| [[Speedster]] || [[File:MMX6 - Part Speedster.png|center]] | |||
| Increases running speed. | |||
| [[Central Museum]] (Tsuki) | |||
|- | |||
| [[Jumper]] || [[File:MMX6 - Part Jumper.png|center]] | |||
| Increases jump height and distance. | |||
| [[North Pole Area]] (Dante) | |||
|- | |||
| [[Hyper Dash]] || [[File:MMX6 - Part Hyper Dash.png|center]] | |||
| Increases dash speed and distance. | |||
| [[Inami Temple]] (Nori) | |||
|- | |||
| [[Energy Saver]] || [[File:MMX6 - Part Energy Saver.png|center]] | |||
| Reduces Weapon Energy cost by 50%, excluding Giga Attacks. | |||
| [[Laser Institute]] (Taiji) | |||
|- | |||
| [[Super Recover]] || [[File:MMX6 - Part Super Recover.png|center]] | |||
| Increases the effects of Life and Weapon Energy pickups. | |||
| [[Amazon Area]] (Goken) | |||
|- | |||
| [[Buster Plus]] || [[File:MMX6 - Part Buster Plus.png|center]] | |||
| Increases X-Buster/Z-Buster shot damage by one. | |||
| [[Magma Area]] (Chibon) | |||
|- | |||
| [[Speed Shot]] || [[File:MMX6 - Part Speed Shot.png|center]] | |||
| Increases projectile speed of the X-Buster/Z-Buster. | |||
| [[Weapon Center]] (Tekk) | |||
|- | |||
| [[Shock Buffer]] || [[File:MMX6 - Part Shock Buffer.png|center]] | |||
| Reduces damage taken by 50% and removes knockback from damage midair. | |||
| [[Recycle Lab]] (Toshi) | |||
|- | |||
| [[D-Barrier]] || [[File:MMX6 - Part D-Barrier.png|center]] | |||
| Doubles mercy invincibility time after taking damage. | |||
| [[Laser Institute]] (Kenz) | |||
|- | |||
| [[D-Converter]] || [[File:MMX6 - Part D-Converter.png|center]] | |||
| Damage taken is also converted into Weapon Energy. | |||
| [[Weapon Center]] (Paralla) | |||
|- | |||
! colspan=4 | X Parts | |||
|- | |- | ||
| [[]] | | [[Rapid 5]] || [[File:MMX6 - Part Rapid 5.png|center]] | ||
| | | Increases the maximum number of X-Buster shots from three to five. | ||
| | | [[Amazon Area]] (Kuborina) | ||
|- | |||
| [[Ultimate Buster]] || [[File:MMX6 - Part Ultimate Buster.png|center]] | |||
| X only fires Charge Shots, including Special Weapons. | |||
| [[Magma Area]] (Keiji) | |||
|- | |||
| [[Quick Charge]] || [[File:MMX6 - Part Quick Charge.png|center]] | |||
| Halves charge time required for Charge Shots. | |||
| [[Central Museum]] (Bad) | |||
|- | |||
| [[Weapon Plus]] || [[File:MMX6 - Part Weapon Plus.png|center]] | |||
| Increases Special Weapon damage by one. | |||
| [[Laser Institute]] (SO 1) | |||
|- | |||
! colspan=4 | Zero Parts | |||
|- | |||
| [[Saber Plus]] || [[File:MMX6 - Part Saber Plus.png|center]] | |||
| Increases Z-Saber slash damage by one. | |||
| [[Inami Temple]] (Rena) | |||
|- | |||
| [[Saber Extend]] || [[File:MMX6 - Part Saber Extend.png|center]] | |||
| Extends Z-Saber slash range with a yellow blade. | |||
| [[Recycle Lab]] (Dajango) | |||
|- | |||
| [[Shot Eraser]] || [[File:MMX6 - Part Shot Eraser.png|center]] | |||
| Z-Saber slashes can destroy certain projectiles. | |||
| [[North Pole Area]] (Ryu) | |||
|- | |||
| [[Master Saber]] || [[File:MMX6 - Part Master Saber.png|center]] | |||
| Increases Technique damage by one. | |||
| [[Weapon Center]] (Metal) | |||
|- | |||
! colspan=4 | Limited Parts | |||
|- | |||
| [[Hyperdrive]] || [[File:MMX6 - Part Hyperdrive.png|center]] | |||
| Grants a temporary defense boost. | |||
| [[Recycle Lab]] (Inaria) | |||
|- | |||
| [[Power Drive]] || [[File:MMX6 - Part Power Drive.png|center]] | |||
| Grants a temporary damage increase of one to all attacks. | |||
| [[Magma Area]] (Hal) | |||
|- | |||
| [[Weapon Drive]] || [[File:MMX6 - Part Weapon Drive.png|center]] | |||
| Grants temporary exemption from Weapon Energy costs. | |||
| [[North Pole Area]] (Nina) | |||
|- | |- | ||
| | | [[Life Recover]] || [[File:MMX6 - Part Life Recover.png|center]] | ||
| Completely refills Life Energy, like a Sub Tank. | |||
| [[Amazon Area]] (Iso) | |||
|- | |- | ||
| [[]] | | [[Weapon Recover]] || [[File:MMX6 - Part Weapon Recover.png|center]] | ||
| | | Completely refills Weapon Energy, like a Weapon Sub Tank. | ||
| | | [[Inami Temple]] (Yui) | ||
|- | |- | ||
| [[Overdrive]] || [[File:MMX6 - Part Overdrive.png|center]] | |||
| Grants a temporary buster buff; X fires rapid Charge Shots, Zero fires rapid shots. | |||
| [[Central Museum]] (Mars) | |||
|} | |} | ||
== Related Media == | |||
=== Ports and Remakes === | |||
* ''[[Mega Man X Collection]]'' (port) | |||
* ''[[Mega Man X Legacy Collection 2]]'' (port) | |||
=== Strategy Guides === | |||
* ''[[Compendium of Rockman X]]'' (Japanese) | |||
* ''Kanpeki Kōryaku #9: [[Rockman X6 Hisshō Kōryaku-hō]]'' (Japanese) | |||
* ''[[Haoh Game Special]] #197: [[Rockman X6 Kanzen Kōryaku Guide]]'' (Japanese) | |||
==References== | |||
<references/> | |||
== External Links == | == External Links == | ||
* [https://en.wikipedia.org/wiki/Mega_Man_X6 Wikipedia] | * [https://en.wikipedia.org/wiki/Mega_Man_X6 Wikipedia] | ||
Latest revision as of 22:40, 15 May 2024
| <-- Mega Man X5 | X series | Mega Man X7 --> |
|---|
 Box Art | |||||||||||||||
| General information | |||||||||||||||
|---|---|---|---|---|---|---|---|---|---|---|---|---|---|---|---|
| Game Title(s): | Mega Man X6, Megaman X6, Rockman X6 | ||||||||||||||
| Developer(s): | Capcom | ||||||||||||||
| Publisher(s): | Capcom | ||||||||||||||
| Release Date(s): |
| ||||||||||||||
| Genre(s): | Action, Platformer | ||||||||||||||
| Game mode(s): | Single Player | ||||||||||||||
| Platform(s): | PlayStation Windows | ||||||||||||||
Mega Man X6, known in Japan as Rockman X6 (ロックマンX6, Rokkuman X6) is the sixth entry in the main X series, developed and published by Capcom for the PlayStation in 2001-2002, becoming the final Mega Man game for the console. It later received a Windows port in a few regions.
Story
Three weeks after the fall of the Eurasia colony, a mysterious phenomenon called the Nightmare begins to occur. Rumors spread that the cause of these Nightmares is the ghost of Zero, leading X to embark on an investigation. Secretly, the genius scientist Gate is manipulating the Nightmare from the shadows, having created it from a fragment containing Zero's DNA. He also used it to create the strongest Reploid ever, High Max, who now stands in X's way. Can X put a stop to Gate's ambitions...?[1]
Characters
| Name | Image | Description |
|---|---|---|
| X | X leads the 17th Unit of the Maverick Hunters. He's working on the Earth recovery operation with other Hunters when he receives Alia's SOS.[2] | |
| Zero | Zero once headed up the Special 0 Unit. An SA-Class Hunter, he single-handedly saved the Earth from destruction. He has been missing since the Sigma incident. Few believe he'll ever be found.[2] | |
| Alia | 
|
The Hunters' navigator, Alia analyzes situations and provides appropriate backup for Hunters on missions. She has an impressive aptitude for analyzing computer programs.[2] |
| Signas | 
|
The young general of the Hunters, Signas has gained the corps' trust and loyalty with his cool judgement and level-headed leadership.[2] |
| Douglas | An expert mechanic, Douglas devises and maintains all the Hunters' equipment, including weapons, vehicles, and facilities. He has thrown himself into the recovery operation with fierce dedication.[2] | |
| Zero Nightmare | A mysterious and dangerous being that highly resembles Zero. Some are calling it the "ghost of Zero", but what is its true nature? | |
| High Max | 
|
High Max leads an investigative team created by Isoc. His abilities are said to surpass X and Zero's — yet no one knows why he was created.[2] |
| Isoc | 
|
The scientist Reploid Isoc pulls together an investigative team to resolve the mystery of the "Nightmare Phenomenon."[2] |
| Gate | Once considered a genius in Reploid development, Gate has lately been shunned in scientific circles because his research was misunderstood. His luck begins to change when he discovers something interesting...[2] | |
| Sigma | .gif)
|
The evil mastermind who was defeated by Zero after his plans nearly destroyed the planet. Someone has helped him return from the dead, but he's definitely worse for wear. |
| Dynamo | A mercenary once hired by Sigma. He now seeks to profit off the power of the Nightmare. | |
| Dr. Light | 
|
The creator of X, who has left Light Capsules to deliver Armor Parts to him, years after his own passing. |
Enemies
Minor Enemies


Mini Bosses
| Name | Image | Description | Stage(s) |
|---|---|---|---|
| Illumina | 
|
Weapon Center | |
| Nightmare Pressure | 
|
Recycle Lab | |
| Nightmare Snake | 
|
Magma Area |
Bosses
Mavericks
| Name | Image | Description | Weapon | Weakness | ||
|---|---|---|---|---|---|---|
| X | Zero | X | Zero | |||
| Commander Yammark | 
|
Yammar Option | Ray Arrow | Rekkoha | ||
| Rainy Turtloid | 
|
Meteor Rain | Ensuizan | Ice Burst | Hyoroga | |
| Shield Sheldon | 
|
Guard Shell | Metal Anchor | Rakukojin | ||
| Blizzard Wolfang | 
|
Ice Burst | Hyoroga | Magma Blade | Shoenzan | |
| Blaze Heatnix | 
|
Magma Blade | Shoenzan | Ground Dash | Sentsuizan | |
| Infinity Mijinion | Ray Arrow | Rekkoha | Guard Shell | |||
| Metal Shark Player | 
|
Metal Anchor | Rakukojin | Meteor Rain | Ensuizan | |
| Ground Scaravich | Ground Dash | Sentsuizan | Yammar Option | |||
Other Bosses
| Name | Image | Description | Weakness | |
|---|---|---|---|---|
| X | Zero | |||
| D-1000 | 
|
Z-Saber | N/A | |
| High Max (Opening Stage) |
|
N/A | N/A | |
| Zero Nightmare | Z-Saber | N/A | ||
| High Max (Another Route) |
|
|||
| Dynamo | Meteor Rain | Ensuizan | ||
| Nightmare Mother | 
|
Metal Anchor | Rakukojin | |
| High Max (Secret Lab) |
|
|||
| Gate | .gif)
|
N/A | N/A | |
| Sigma |
|
Metal Anchor | Rakukojin | |
| Hell Sigma | 
|
Ground Dash | Sentsuizan | |
Weapons
X Weapons
By default, X wields the X-Buster, a long-range buster, and the Z-Saber, a short-range saber. By defeating the eight Maverick bosses, he copies their Special Weapons with unique properties and elements. He can also upgrade his X-Buster and gain Giga Attacks by collecting and equipping Armor Parts.
| Name | Icon | Description | Source |
|---|---|---|---|
| X-Buster | X's default weapon. It fires up to three shots horizontally, and can be charged up for a Charge Shot of two levels. Equipping Armor Parts can alter the properties of the max Charge Shot. | Default | |
| Z-Saber | X's default sub-weapon. It performs one powerful slash at a time. | ||
| Yammar Option | - | Commander Yammark | |
| Ice Burst | - | Blizzard Wolfang | |
| Magma Blade | - | Blaze Heatnix | |
| Metal Anchor | - | Metal Shark Player | |
| Ground Dash | - | Ground Scaravich | |
| Meteor Rain | - | Rainy Turtloid | |
| Guard Shell | - | Shield Sheldon | |
| Ray Arrow | - | Infinity Mijinion | |
| Giga Attack | A powerful attack that only gains Weapon Energy when damage is taken. Attack changes depending on the Armor Parts equipped. | Armor Parts |
Zero Weapons
Zero wields the Z-Saber, a close-range beam saber, and the Z-Buster, a long-range buster. By defeating the eight Maverick bosses, he gains Techniques to perform with his saber. Some of these Techniques are ability upgrades, while others are brand new attacks.
| Name | Icon | Description | Source |
|---|---|---|---|
| Z-Saber | Zero's default weapon. On the ground, it can slash three times in quick succession for a combo. In the air, on walls, and on ladders, it can only slash once at a time. | Default | |
| Z-Buster | Zero's default sub-weapon. Fires a single Z-Buster shot while standing still. | ||
| Yammar Option | - | Commander Yammark | |
| Hyoroga | - | Blizzard Wolfang | |
| Shoenzan | - | Blaze Heatnix | |
| Rakukojin | - | Metal Shark Player | |
| Sentsuizan | - | Ground Scaravich | |
| Ensuizan | - | Rainy Turtloid | |
| Guard Shell | - | Shield Sheldon | |
| Rekkoha | - | Infinity Mijinion |
Stages

- Opening Stage
- Amazon Area (Commander Yammark)
- Inami Temple (Rainy Turtloid)
- Laser Institute (Shield Sheldon)
- North Pole Area (Blizzard Wolfang)
- Magma Area (Blaze Heatnix)
- Weapon Center (Infinity Mijinion)
- Recycle Lab (Metal Shark Player)
- Central Museum (Ground Scaravich)
- Last Stages:
Items
| Name | Sprite | Description |
|---|---|---|
| Life Energy | Small units restore 4 points of Life Energy. Large units restore 16 points of Life Energy. MAX units fully restore all Life Energy. | |
| Weapon Energy | Small units restore 4 points of Weapon Energy. Large units restore 16 points of Weapon Energy. MAX units fully restore all Weapon Energy. | |
| Nightmare Soul | Counts towards increasing the player's Hunter Rank, allowing them to equip more Parts. Each kind has a different worth and is acquired through different means. | |
| 1-UP | Grants an extra life. | |
| Injured Reploid | Restores 4 points of Life Energy and grants an extra life. Certain Reploids also grant Parts, ranging from equippable Parts, to Life Ups or Energy Ups that are applied automatically. | |
| Ride Armor |  |
In a Ride Armor, the player takes no damage and can use powerful punch and slash attacks. One can be found in Recycle Lab. |
| Portal | Transports the player to a new location. Each of the eight stages has one that leads to an Another Route. | |
| Life Up | Permanently increases maximum Life Energy by 4 points. | |
| Sub Tank | Grants a reserve tank which can be filled by Life Energy pickups and used later. | |
| Weapon Sub Tank | Grants a reserve tank which can be filled by Weapon Energy pickups and used later. | |
| EX Item | Permanently increases the player's initial amount of extra lives by 2. | |
| Light Capsule |  |
Grants an Armor Program; once all four are collected, they unlock a new armor for X to equip. |
Armor Parts
Parts
| Name | Icon | Description | Source |
|---|---|---|---|
| Normal Parts | |||
| Life Up | Permanently increases maximum Life Energy by 2 points. Applied immediately. | One Injured Reploid per stage | |
| Energy Up | Permanently increases maximum Weapon Energy by 2 points. Applied immediately. | ||
| Speedster | Increases running speed. | Central Museum (Tsuki) | |
| Jumper | Increases jump height and distance. | North Pole Area (Dante) | |
| Hyper Dash | Increases dash speed and distance. | Inami Temple (Nori) | |
| Energy Saver | Reduces Weapon Energy cost by 50%, excluding Giga Attacks. | Laser Institute (Taiji) | |
| Super Recover | Increases the effects of Life and Weapon Energy pickups. | Amazon Area (Goken) | |
| Buster Plus | Increases X-Buster/Z-Buster shot damage by one. | Magma Area (Chibon) | |
| Speed Shot | Increases projectile speed of the X-Buster/Z-Buster. | Weapon Center (Tekk) | |
| Shock Buffer | Reduces damage taken by 50% and removes knockback from damage midair. | Recycle Lab (Toshi) | |
| D-Barrier | Doubles mercy invincibility time after taking damage. | Laser Institute (Kenz) | |
| D-Converter | Damage taken is also converted into Weapon Energy. | Weapon Center (Paralla) | |
| X Parts | |||
| Rapid 5 | Increases the maximum number of X-Buster shots from three to five. | Amazon Area (Kuborina) | |
| Ultimate Buster | X only fires Charge Shots, including Special Weapons. | Magma Area (Keiji) | |
| Quick Charge | Halves charge time required for Charge Shots. | Central Museum (Bad) | |
| Weapon Plus | Increases Special Weapon damage by one. | Laser Institute (SO 1) | |
| Zero Parts | |||
| Saber Plus | Increases Z-Saber slash damage by one. | Inami Temple (Rena) | |
| Saber Extend | Extends Z-Saber slash range with a yellow blade. | Recycle Lab (Dajango) | |
| Shot Eraser | Z-Saber slashes can destroy certain projectiles. | North Pole Area (Ryu) | |
| Master Saber | Increases Technique damage by one. | Weapon Center (Metal) | |
| Limited Parts | |||
| Hyperdrive | Grants a temporary defense boost. | Recycle Lab (Inaria) | |
| Power Drive | Grants a temporary damage increase of one to all attacks. | Magma Area (Hal) | |
| Weapon Drive | Grants temporary exemption from Weapon Energy costs. | North Pole Area (Nina) | |
| Life Recover | Completely refills Life Energy, like a Sub Tank. | Amazon Area (Iso) | |
| Weapon Recover | Completely refills Weapon Energy, like a Weapon Sub Tank. | Inami Temple (Yui) | |
| Overdrive | Grants a temporary buster buff; X fires rapid Charge Shots, Zero fires rapid shots. | Central Museum (Mars) | |
Related Media
Ports and Remakes
- Mega Man X Collection (port)
- Mega Man X Legacy Collection 2 (port)
Strategy Guides
- Compendium of Rockman X (Japanese)
- Kanpeki Kōryaku #9: Rockman X6 Hisshō Kōryaku-hō (Japanese)
- Haoh Game Special #197: Rockman X6 Kanzen Kōryaku Guide (Japanese)
References
External Links
| Characters | | ||||||||
|---|---|---|---|---|---|---|---|---|---|
| Enemies |
| ||||||||
| Weapons |
| ||||||||
| Stages |
| ||||||||
| Items |
| ||||||||
| Challenges |
| ||||||||
| Achievements |
| ||||||||
| Related media | |||||||||
Part of: X era • Original Timeline | |||||||||
| Games |
|  |
|---|---|---|
Part of: X era • Original Timeline | ||
This article is a stub. You can help Mega Man Wiki by expanding it.